Workflow Visualization and User Interaction, Part II

In my previous post, I began the process of creating a sample implementation of a user control that would allow the user to view and interact with the constituent steps inside a running workflow. I created the wrapper classes for both the sequence and step, created the business activities (AddViewToRegion and ClearViewsFromRegion) and created two workflow activities (OrderedActivity and UnorderedActivity) Now I will create the user control that will bind to the data entities defined in my workflow activities, as well as wire everything up.

WorkflowViewerView.xaml

            <ComboBox  x:Name="ActivityDropDown" Grid.Row="0"  DockPanel.Dock="Top"
                  ItemsSource="{Binding ActivityCV}">
            <ComboBox.ItemTemplate>
                <DataTemplate>
                    <TextBlock Text="{Binding Name}" />
                </DataTemplate>
            </ComboBox.ItemTemplate>
        </ComboBox>
        <DockPanel Grid.Row="1" >
            <Button x:Name="Complete" prism:Click.Command="{Binding CompleteCommand}" DockPanel.Dock="Bottom">
                <TextBlock>Complete</TextBlock>
            </Button>
            <ListBox x:Name="ActivityItemListBox" SelectionMode="Single" DockPanel.Dock="Top"
                 HorizontalContentAlignment="Stretch"
                 ItemsSource="{Binding BookmarkCV}">

The xaml for the control will consist of a dropdown control with the selectable activities (in this case, OrderedActivity and UnorderedActivity), a “Complete” button for manual termination of the current activity, and a ListBox to contain and display the collection of UserActivitySteps. Pretty basic WPF binding operations here. Prism provides an interface to tie UI control actions back to the associated view model for this view. I use this for the Click event on the Complete button, tying it to the CompleteCommand on WorkflowViewerViewModel.

                        <DataTemplate.Triggers>
                            <DataTrigger Binding="{Binding RelativeSource={RelativeSource
                                Mode=FindAncestor,
                                AncestorType={x:Type ListBoxItem}},
                                Path=IsSelected}"
                                Value="True">
                                <Setter TargetName="dataBorderShadow" Property="Effect">
                                    <Setter.Value>
                                        <DropShadowEffect ShadowDepth="0" Color="LimeGreen" BlurRadius="10"/>
                                    </Setter.Value>
                                </Setter>
                            </DataTrigger>
                            <DataTrigger Binding="{Binding Status, Mode=OneWay}" Value="{x:Static Activities:UserStepStatus.Completed}">
                                <Setter TargetName="dataBorder" Property="BorderBrush" Value="Green"/>
                                <Setter TargetName="bookmarkValue" Property="Text" Value="Completed"/>
                            </DataTrigger>
                        </DataTemplate.Triggers>

I also defined some data triggers on the items in the ListBox, so that the selected item displays a blur/shadow effect and also so that completed steps will show up as green.

The rest of the functionality comes in the view model implementation.

WorkflowViewerViewModel

        private readonly List<ActivityDescriptor> _model;
        private ObservableCollection<UserStepActivity> _userSteps;
 
        public ICollectionView ActivityCV { get; private set; }
        public ICollectionView BookmarkCV { get; private set; }
        public DelegateCommand CompleteCommand { get; private set; }
 
        public WorkflowViewerViewModel()
        {
            _model = Helper.ActivityList;
            ActivityCV = new ListCollectionView(_model);
            ActivityCV.CurrentChanged += new EventHandler(SelectedItemChanged);
 
            _userSteps = new ObservableCollection<UserStepActivity>();
            BookmarkCV = new ListCollectionView(this._userSteps);
            BookmarkCV.CurrentChanged += new EventHandler(SelectedBookmarkChanged);
 
            CompleteCommand = new DelegateCommand(OnComplete);
        }

The Helper class returns the pre-configured list of two activities for the dropdown to bind against. I initialize the user steps collection, prior to any activity having been selected.

        private void SelectedItemChanged(object sender, EventArgs e)
        {
            // Publish the DataItemSelected event when the current selection changes.
            ActivityDescriptor item = ActivityCV.CurrentItem as ActivityDescriptor;
            if (item != null && item.Xaml != null)
            {
                Helper.TryLoadAndValidateActivity(item.Xaml, out _currentActivity);
 
                _userSteps.Clear();
 
                UserStepSequence rootActivitySequence = default(UserStepSequence);
                Helper.InspectActivity(_currentActivity, _userSteps, ref rootActivitySequence);
                rootActivitySequence.UserStepSequenceChanged += UserStepSequenceChanged;
                _activeActivityBookmark = rootActivitySequence.BookmarkName.Expression.ToString();
 
                _currentWorkflowApplication = new WorkflowApplication(_currentActivity);
                _currentWorkflowApplication.Run();
            }
        }

When the user selects an activity, I load the System.Activities.Activity from the associated xaml file. I then interrogate the activity and extract a reference to the UserStepSequence. This reference allows me to access the constituent step activities and associate them with the user steps collection bound to the ListBox. I can also wire up additional event handlers here for events published by the UserStepSequence (or UserStepActivity for that matter.) I’ll re-use the BookmarkName value to resume the UserStepSequence when the user selects an individual step within the workflow. Finally, I start the workflow application.

        private void SelectedBookmarkChanged(object sender, EventArgs e)
        {
            ActivityDescriptor item = ActivityCV.CurrentItem as ActivityDescriptor;
 
            if (item != null && item.Xaml != null)
            {
                UserStepActivity userStep = BookmarkCV.CurrentItem as UserStepActivity;                
                if (userStep != null)
                {
                    _currentWorkflowApplication.ResumeBookmark(_activeActivityBookmark, userStep.BookmarkNameValue);            
                }
            }
        }

After confirming I have an active activity, I read the ListBox item selected by the user an use the BookmarkNameValue for that step as an argument into the ResumeBookmark call on the workflow. Now for some screenshots.

Activity Selection

User selects an activity from the dropdown list.

Invalid Step Selection

User selects the second step prior to completing the first, so no action takes place.

Step 3 Selection

User proceeds through the steps sequentially, finally selecting the last step.


Conclusion
And…that’s pretty much it! The sample at the end of the post has additional functionality, or at least, a first pass at some additional functionality around messaging events up from the sequence and sequence steps as well as managing status transitions for the steps themselves. But the core of the sample, which I’ve reviewed above, demonstrates the key functionality needed to accomplish my original goals. I hope that this is enough to get you started on your own custom (and more robust) implementations that will accomplish your own goals for visualizing workflow applications!

Please find the sample source code here

Posted in Code Samples, Uncategorized | Leave a comment

Workflow Visualization and User Interaction, Part I

Introduction

Workflows can do a wonderful job of giving you increased visibility into the structure and flow of the source code underlying a given business process. This is typically accomplished through the built-in designer, which allows you do dragging and dropping of activities and flow control structures. The experience is not too dissimilar from that associated with Windows Forms application design. You plop a bunch of visual elements onto your form, then you go in and add the meat to your implementation behind the scenes.

More than one person has asked the question “How can I give my users visibility into the workflow itself?” And that question has been answered, typically, by wrapping or re-hosting the existing designer implementation into your own application.

But what if I want a different visualization of that workflow? In other words, what if I don’t want to show my users the gritty details of “how the sausage is made” and would prefer, instead, to show them a stripped down view of the workflow. Furthermore, what if I could also provide my users with some interactivity or flow control for the running workflow?

These are the challenges I am trying to address when creating the following prototype. My goals are:

  1. Create a user control (in this case, a view from MVVM) that could display a visual representation of an activity sequence.
  2. The control should only display a subset of elements from the underlying XAML for the activity.
  3. The control should inform the user of where it is within the workflow (e.g. visualization of current and completed steps.)
  4. The control should allow the user to interact with the workflow, by re-executing a completed step, or by resuming flow at a different step within the sequence.

Part I – Base Solution and Custom Classes

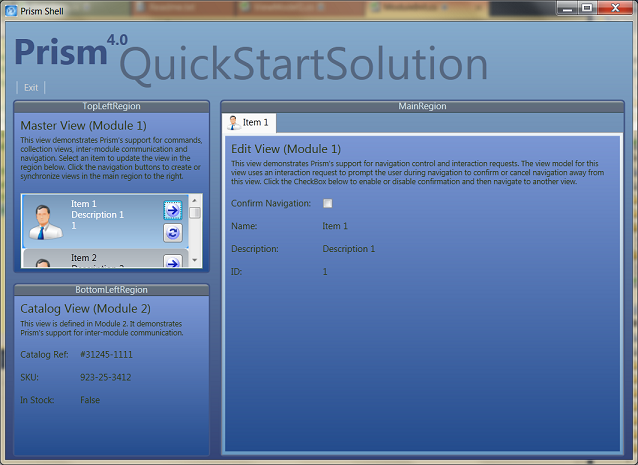
Similar to previous exercises, I’m starting out by using the quickstart for WPF and Prism: “Prism WPF 4.0 QuickStart Solution (Unity)” This gives me a functional application infrastructure to start from that is easy to reproduce on any system where Prism has been installed. (You can find the installation bits for Prism here

For this exercise, I’m going to change the view that loads into the bottom left region, currently the CatalogView from Module2, and create a WorkflowViewerView to load into that region instead. The WorkflowViewerView will serve as the visualizer and flow control element for my workflows, with the rest of the application responding to the actions taken by the user on that control.

The sample I’m creating will deal with clearing and loading different views into the main content area of the application. I’m going to ultimately create two workflows, one that allows the user to execute the steps in any order (UnorderedActivity) and one that restricts the order of step execution (OrderedActivity)

To accomplish my goals, I am going to start by defining a custom class for my visual sequence (UserStepSequence.cs) and visual sequence step (UserStepActivity.cs)

UserStepSequence

    [Designer("System.Activities.Core.Presentation.SequenceDesigner, System.Activities.Core.Presentation")]
    public class UserStepSequence : NativeActivity

By inheriting from NativeActivity and adding the Designer attributes, I will be able to use my activity in the visual designer.

        [RequiredArgument]
        public InArgument<bool> Ordered { get; set; }
        [RequiredArgument]
        public InArgument<string> BookmarkName { get; set; }

I define two properties on the class, one to indicate whether or not the user may execute the constituent activity steps in any order or must follow the pre-determined flow. The second is an identifier for this activity, “BookmarkName”

        protected override void CacheMetadata(NativeActivityMetadata metadata)
        {
            //metadata.AddImplementationChild(InnerSequence);
            foreach (Activity a in InnerSequence.Activities)
                metadata.AddImplementationChild(a);
        }
 
        protected override void Execute(NativeActivityContext context)
        {
            if (this._activitiesInitialized == false)
            {
                this.InitializeActivities();
            }
 
            context.CreateBookmark(BookmarkName.Expression.ToString(), 
                                   OnResumeBookmark, 
                                   BookmarkOptions.MultipleResume);
        }
 
        // NativeActivity derived activities that do asynchronous operations by calling 
        // one of the CreateBookmark overloads defined on System.Activities.NativeActivityContext 
        // must override the CanInduceIdle property and return true.
        protected override bool CanInduceIdle
        {
            get { return true; }
        }

These are a series of overrides that facilitate the implementation. The sequence acts as a wrapper to the child steps within this workflow. Therefore, when leveraging ResumeBookmark, the wrapping activity needs to relay information about the bookmark to resume down to the appropriate constituent step (see below.)

        public void OnResumeBookmark(NativeActivityContext context, Bookmark bookmark, object obj)
        {
            // the root activity is resumed, and in turn targets a child activity to schedule
            var userStep = InnerSequence.Activities.FirstOrDefault(
                a => ((UserStepActivity) a).BookmarkName.Expression.ToString() == 
                      (string) obj) as UserStepActivity;
 
            if (userStep != null)
            {
                bool isValid = true;
 
                // if ordered, do not allow skipping ahead ("rewind" allowed if re-runnable step)
                // ...
                
                if ((userStep.Status.IsSet(UserStepStatus.Completed) || 
                     userStep.Status.IsSet(UserStepStatus.CompletedWithErrors)) &&
                        Helper.ConvertArgumentToBool(userStep.ReRunnable) == false)
                {
                    // for un-ordered sequences, any activity is eligible as long as it is re-runnable or not yet marked completed
                    // …
                }
                if (isValid == true)
                {
                    context.ScheduleActivity(userStep, OnCompleted, OnFaulted);
                }
            }
            else
            {
                // Notify no matching step was found to resume
                // …
            }
        }

(Redacted for clarity), in the event handler for resume bookmark, I locate the requested visual step, verify that the user is not skipping ahead nor re-running an already completed step (unless allowed) before scheduling that step against the current native activity context. This is, in essence, all that UserStepSequence is responsible for: owning and managing the execution of its constituent steps.

UserStepActivity

    [Designer("System.Activities.Core.Presentation.SequenceDesigner, System.Activities.Core.Presentation")]
    public class UserStepActivity : NativeActivity, INotifyPropertyChanged

Similar to its parent, the step activity also implements NativeActivity and shares the designer attributes for visualization during workflow definition. It also implements INotifyPropertyChanged so that I can bind visual elements to the status of the step itself (e.g. “turn green when completed” or similar.)

        [RequiredArgument]
        public InArgument<string> BookmarkName { get; set; }
        [RequiredArgument]
        public InArgument<bool> ReRunnable { get; set; }
        [RequiredArgument]
        public InArgument<bool> VisibleStep { get; set; }
        [RequiredArgument]
        public InArgument<bool> CanSetStatus { get; set; }

The step defines a series of designer configurable attributes:

  • BookmarkName – used to target this step on ResumeBookmark operations
  • ReRunnable – do I allow the user to “re-execute” this step after it has been completed once?
  • VisibleStep – should this step appear in the UserControl visualization?
  • CanSetStatus – do I allow the wrapping activity, UserStepSequence, to set status values on this step explicitly?
        protected override void Execute(NativeActivityContext context)
        {
            // wrapping sequence has validated execution already
            context.ScheduleActivity(InnerSequence, OnCompleted, OnFaulted);
        }

When the wrapping UserStepSequence schedules this activity step, it has already validated that the step may be run, so we do not need an additional check here. As I’ll demonstrate shortly, both the UserStepSequence and UserStepActivity classes act as collection wrappers. UserStepSequence wraps a collection of UserStepActivities, which in turn wrap a collection of zero or more business activities.

Business Activities

The business activities I’ll use in this sample are straigthforward:

  • AddViewToRegion – adds the specified view to the specified region
  • ClearViewsFromRegion – removes all views from the specified region
        protected override void Execute(NativeActivityContext context)
        {
            var viewNameValue = context.GetValue(this.ViewName);
            var viewTypeValue = context.GetValue(this.ViewType);
            var regionNameValue = context.GetValue(this.RegionName);
            var parmName = context.GetValue(this.ParameterName);
            var parmValue = context.GetValue(this.ParameterValue);
            Helper.MarshalToUiThread(delegate
                 {
                     var regionManager = ServiceLocator.Current.TryResolve<IRegionManager>();
                     UriQuery parameters = new UriQuery();
                     parameters.Add(parmName, parmValue);
                     regionManager.RequestNavigate(regionNameValue,
                                                   new Uri(
                                                       viewNameValue + parameters.ToString(),
                                                       UriKind.Relative));
                 });
        }

This is a pretty straight-forward implementation of pulling parameter values out of the activity definition and using them in the code-behind for the activity. In this case, we resolve an instance of IRegionManager and use it to process our navigation request for the specified view. The MarshalToUiThread helper method ensures that while the activity will not run on the UI thread, the navigation to the view element will occur on the UI thread (so the user can see it.)

I added the parameter arguments so as to emulate the default navigation implementation that comes out of the box in the quickstart sample (where the “item” IDs are specified in the Uri parameter arguments for the EditDetail view.) To clarify, this is a “dummy” activity whose purpose is to show interaction with the workflow visualization.

ClearViewsFromRegion is an even simpler implementation (see below.)

        protected override void Execute(NativeActivityContext context)
        {
            var regionNameValue = context.GetValue(this.RegionName);
            Helper.MarshalToUiThread(delegate
                 {
                     var regionManager = ServiceLocator.Current.TryResolve<IRegionManager>();
                     List<object> views =
                       new List<object>(regionManager.Regions[regionNameValue].Views);
                     foreach (object view in views)
                     {
                         regionManager.Regions[regionNameValue].Remove(view);
                     }
                 });
        }

Workflows

Okay, I am finally ready to define some actual workflows using my constituent activities. My first workflow, OrderedActivity, will consist of three steps:

  1. “Step 1”, Visible = True, ReRunnable = False
    • ClearViewsFromRegion (MainContent)
    • AddViewToRegion (Module1.Views.EditView, MainContent, ID = 1)
    • AddViewToRegion (Module1.Views.EditView, MainContent, ID = 2)
  2. “Step 2”, Visible = True, ReRunnable = True
    • ClearViewsFromRegion (MainContent)
  3. “Step 3”, Visible = True, ReRunnable = True
    • AddViewToRegion (Module1.Views.EditView, MainContent, ID = 3)
    • AddViewToRegion (Module1.Views.EditView, MainContent, ID = 4)

Note that I have designated the initial step as ReRunnable = False, meaning that the user will not be able to re-execute this step once completed. The remaining steps do allow re-running, so the user may re-execute them as many times as they wish.

To create activity itself, I only had to build the existing solution and then add a new Activity from the Workflow templates. Within the designer view, I opened the Toolbox pane and expanded the Common.Activities sub-header to view the activities I had previously defined.

I then dragged a UserStepSequence into my designer, dropped the three UserStepActivities into that sequence, and then dropped the business activities into those activity steps. This was definitely the easy part!

OrderedActivity

OrderedActivity

My second workflow, UnorderedActivity, will consist of five steps:

  1. “Step 1”, Visible = True, ReRunnable = True
    • ClearViewsFromRegion (MainContent)
  2. “Step 2”, Visible = True, ReRunnable = True
    • AddViewToRegion (Module1.Views.EditView, MainContent, ID = 1)
  3. “Step 3”, Visible = True, ReRunnable = True
    • AddViewToRegion (Module1.Views.EditView, MainContent, ID = 2)
  4. “Step 4”, Visible = True, ReRunnable = True
    • AddViewToRegion (Module1.Views.EditView, MainContent, ID = 3)
  5. “Step 5”, Visible = True, ReRunnable = True
    • AddViewToRegion (Module1.Views.EditView, MainContent, ID = 4)

Again, a clearly trivial implementation whose purpose is to demonstrate the ability for the user to bounce around between steps within the currently executing workflow.

UnorderedActivity

UnorderedActivity

Okay this concludes Part I of creating the workflow visualizer. Part II should go quickly now that I’ve got all the constituent classes and activities defined. I just need to implement the user control and interactions. I will also include the entire sample implementation for download. (Coming soon in Part II)

Thanks for reading, and please let me know if you have any questions or comments!

Posted in Code Samples, Uncategorized | 1 Comment

Unity and the Hierarchical Lifetime Manager

Introduction

Disclaimer: I’ve seen this topic partially addressed elsewhere, but I felt that a simple and direct explanation might be of some additional value. I believe that the importance and utility of the HierarchicalLifetimeManager when used to assist with session management within the Unity framework deserves [at least!] one more post.

When registering types with the IUnityContainer, you may specify a LifetimeManager whose purpose is to scope the lifetime of any instances resolved out of your container for that type. The purpose of this article is to discuss the utility of one of these: the HierarchicalLifetimeManager.

How Lifetime Managers Work

When using the RegisterType method on the Unity Container, the default lifetime manager is the TransientLifetimeManager. This lifetime manager returns a new instance of the registered type on each request, which is not the behavior I want here. Instead, I am going to explicitly specify the ContainerControlledLifetimeManager. By using this lifetime manager, any resolution of the registered type will give me a singleton instance which is scoped to the lifetime of my container:

    IUnityContainer unityContainer = new UnityContainer();
    unityContainer.RegisterType(new ContainerControlledLifetimeManager());
    IDiagnosticsManager diagManager = unityContainer.Resolve();

There is a third lifetime manager I want to discuss, the HierarchicalLifetimeManager (for which this post was written.) This LifetimeManager resolves a singleton instance of the registered type scoped to the lifetime of the container which performed the resolution (but not, necessarily, the container where the type was registered!)

Confused? I was! In the trivial case where your application only makes use of a single container, there is no difference in behavior between the Hierarchical and ContainerControlled LifetimeManagers. The interesting case arises when you make use of a hierarchy of containers; with the most typical example being that of session management.

Session Management and Container Scoping

For example, my business user takes calls through my application. I want to be able to isolate my singletons (e.g. service instances, session data, etc.) on a per-call basis, not on a per-application instance basis. In this fashion, I safely isolate my call data from one call to another, but I preserve the utility of resolving singletons out of my container.

Here is a simplified example of the issue at hand:

        IUnityContainer unityContainer = new UnityContainer();
        unityContainer.RegisterType(new ContainerControlledLifetimeManager());

I’ve registered my customer profile as a singleton on the root container. Now let’s take a peek inside my application session class:

        private readonly IUnityContainer _scopedContainer;
        private readonly ICustomerProfile _custProfile;
        public ApplicationSession(IUnityContainer container)
        {
            // create a child container, scoped for this session
            this._scopedContainer = container.CreateChildContainer();
            // track a (singleton) ICustomerProfile instance per session
            this._custProfile = this._scopedContainer.Resolve();
        }

        public CallData CallData
        {
            get { return this._custProfile.LastCallData; }
            set { this._custProfile.UpdateCallHistory(value); }
        }

Okay, I create a scoped container for the current session, and I resolve an instance of customer profile out of the scoped container. I use the instance of customer profile to manage interactions with the CallData property for the session. Here is where it gets tricky:

        // call #1 comes in, I create a session instance
        IApplicationSession newSession = unityContainer.Resolve();
        sessionManager.AddAndActivateSession(newSession);
        newSession.CallData = callData;
        // ...
        // call #2 comes in, I create another session instance
        IApplicationSession newSession = unityContainer.Resolve();
        sessionManager.AddAndActivateSession(newSession);
        newSession.CallData = callData;

Each of my sessions has a distinct scoped child container, but because I used ContainerControlledLifetimeManager when I registered the ICustomerProfile type, both child containers are resolving the ICustomerProfile to the same instance. Therefore, if my user is handling two concurrent calls, he will end up writing customer #2’s call data into customer #1’s call history profile!

Luckily, the only change required to fix this issue is to change the registration of ICustomerProfile from:

    unityContainer.RegisterType(new ContainerControlledLifetimeManager());

to:

    unityContainer.RegisterType(new HierarchicalLifetimeManager());

Now each of my scoped containers will resolve their own instance of the ICustomerProfile singleton, despite the type being originally registered with the root container. (Keep in mind, the above example is grossly simplified in an effort to reduce the explanation to its core issue.)

I hope this helped to illustrate the usefulness of the HierarchicalLifetimeManager. As always, I’m happy to hear your questions and comments. Happy programming!

Posted in Code Samples, Uncategorized | 11 Comments

Federated Search with Prism and Unity, Part III

Introduction

This is the third post in a series on implementing a web-style search inside a composite application using Prism and Unity and WPF.

Previously, in Part II, I implemented the eventing model for communicating search requests and responses.  I also implemented a generic search handler that would relay the search request to Google.  Finally, I created the SearchResultsView to display search results to the user.

Part III – Search Results

Search Results Navigation

What happens when the user clicks an individual search result from the previous section?  The navigation infrastructure is there to take the user to “GenericWebView” but I still need to implement the actual view.  I want this view to be a simple wrapper control around a WebBrowser control whose url I can specify via a databound property on the underlying view model.

I am going to create a new User Control named “GenericWebView” within the SearchModule project, inside the Views folder.  I will also create a new class, “GenericWebViewModel”, located inside the ViewModel folder.  There is a third class I am adding to the root of the SearchModule project, entitled “WebBrowserUtility”, whose purpose is to define a dependency property, BindableSource, that I can use to dynamically update the WebBrowser.Source property.

By default, there is no way to communicate a change to the 
WebBrowser control's Source property from the view model 
class.  In order to preserve separation of concerns, I had 
to define a dependency property (BindableSource) that I can 
use to trigger an update to the WebBrowser from the view 
model.  You can read more about dependency properties here.

Now I am going to modify the xaml inside the GenericWebView to include a WebBrowser control as well as designating the BindableSource property as being bound to the view’s data context URI property (found in the GenericWebViewModel class.)

    <Grid>
        <WebBrowser x:Name="WebBrowser" SearchModule:WebBrowserUtility.BindableSource="{Binding URI}" />
    </Grid>

Here is an excerpt from the WebBrowserUtility class which demonstrate how the dependency property is translated into a value assigned to the WebBrowser’s Source property.

        public static void BindableSourcePropertyChanged(DependencyObject o, DependencyPropertyChangedEventArgs e)
        {
            var browser = o as WebBrowser;
            if (browser != null)
            {
                var uri = e.NewValue as string;
                browser.Source = !string.IsNullOrEmpty(uri) ? new Uri(uri) : null;
            }
        }

Now I need to modify the GenericWebViewModel. Specifically, I would like to leverage the Prism framework’s “INavigationAware” interface, which exposes three methods for implementation. The method I care about for this exercise is triggered whenever the current view model’s view is navigated to via the RegionManager.RequestNavigate method (as we are using in the SearchResultsViewModel from the previous section.)

The method I added implementation to is “OnNavigatedTo” and within this method, I read the “uri” property off the parameters in the navigation request and assign that value to the local URI property. Once I call “RaisePropertyChanged”, the data context binding on the view proper will be updated, in turn triggering the dependency property, which in turn will update the WebBrowser Source property.

I’ve included the source code for the GenericWebViewModel here:

    public class GenericWebViewModel : NotificationObject, INavigationAware
    {
        public string URI { get; private set; }
 
        #region INavigationAware Members
        public bool IsNavigationTarget(NavigationContext navigationContext)
        {
            // Called to see if this view can handle the navigation request.
            // If it can, this view is activated.
            return true;
        }
 
        public void OnNavigatedFrom(NavigationContext navigationContext)
        {
            // Called when this view is deactivated as a result of navigation to another view.
        }
 
        public void OnNavigatedTo(NavigationContext navigationContext)
        {
            // Called to initialize this view during navigation.
            string targetURI = navigationContext.Parameters["uri"];
            if (!string.IsNullOrEmpty(targetURI))
            {
                URI = targetURI;
                RaisePropertyChanged("URI");
            }
        }
        #endregion
    }

My final step is to update the Initialize method on the SearchModule’s ModuleInit class. I need to register this new view, GenericWebView, with the container so that when navigation requests are made on the RegionManager, it can resolve the string view specified, “GenericWebView” to the actual class type.

            // register the generic web view type
            _container.RegisterType<Object, GenericWebView>("GenericWebView");

Running the solution again and selecting a result from the SearchResultsView now gives me wrapped browser control displaying the results of my web search.

Web Search Results

Time to move on to the final piece of this exercise!

Integrate with Other Modules

I have my framework in place for search request and response publication and subscription. Now it’s time to integrate this framework with one of the existing modules from the quick-start solution. By following the pattern I created within the SearchModule, I should be able to quickly extend the implementation to another module within the solution.

Module1 consists of three views: Master, Edit and Detail. It also has a collection of sample data defined within its DataService class. I am going to have the Module1 DataService class subscribe to the SearchRequestEvent so that it can participate in any search.

As for the search implementation itself, the DataService class will interrogate its local sample data collection for any exact matches on the “Name” property of its data items. Any matches will be returned in a search response, including the uri for navigation to the Module1 DetailsView.

So first, I create a constructor on the DataService class and inject an EventAggregator instance. Then I subscribe to the SearchRequestEvent as follows.

        private readonly IEventAggregator _eventAggregator;
 
        public DataService(IEventAggregator eventAggregator)
        {
            _eventAggregator = eventAggregator;
 
            // subscribe to the SearchRequestEvent
            _eventAggregator.GetEvent<SearchRequestEvent>().Subscribe(HandleSearchRequest);
        }

Next, I need to implement the method that handles the search request and subsequently publishes the search response. For part of the implementation, I borrowed the code that generates the link uri within the MasterViewModel. Here is the first part of that method’s implementation (with the rest being similar to the HandleSearchRequest method implementation within the SearchModule DataService class.)

        private void HandleSearchRequest(SearchRequestEventData data)
        {
            if (!string.IsNullOrEmpty(data.SearchRequest.RawRequest))
            {
                // performing an exact match against the data items collection (note, assuming only 0 or 1 match here.)
                DataItem item =
                    model.First(di => (string.Compare(di.Name, data.SearchRequest.RawRequest.Trim(), true) == 0));
 
                if (item != null)
                {
                    // here is the code from MasterViewModel that creates and navigates to a selected Detail view
                    var parameters = new UriQuery();
                    parameters.Add("ID", item.Id);
                    //_regionManager.RequestNavigate(RegionNames.MainRegion,
                    //                                new Uri("EditView" + parameters.ToString(), UriKind.Relative),
                    //                                NavigationCompleted);
                    var itemUri = new Uri("DetailsView" + parameters.ToString(), UriKind.Relative);
 
                    // Generate the search result for the SearchResponseEvent

That should be all I need to do to complete the integration. Running the project and conducting a search now yields another section of search results.

Addtional Search Results

Another Section with Results

Selecting the Module1 results link should navigate me to the DetailsView for the search result item.

Integrated Search Result

Item 2 in Details View

And with that, I’ve reached the end of this exercise! It may be helpful to review the entire source, so I have uploaded my solution from this exercise here.

Before I conclude, I wanted to observe that there are several ways to extend this implementation to make it more robust. I’ve included a few here for reference.

Asynchronous Operations

In a production environment, I would be very motivated to implement the actual search operations asynchronously. That is, I would not want my primary thread, and therefore the responsiveness of my UI, to be negatively impacted by conduction one or more searches.

.NET Framework 4.0 has a class you can use to facilitate asynchronous operations called “BackgroundWorker.” You can read more about the BackgroundWorker class here.

Tokenized Search

One drawback of the single search input is that we are no longer allowing the user to specify one or more pre-defined search fields (e.g. “First Name” or “Account Number”) An alternative would be to support some way to denote a set of common system-defined fields: “fn:Steve an:1234”

An even *better* way would be extending the search input textbox to recognize an input and either automatically “tokenizing” it, or prompting the user to select from a list of candidates. For example, the user types: “1234567890” and is prompted to select one of “Order Number (on:)”, “Customer Phone (cph:)”, or “Generic” (the default.)

And the home run scenario here would be to allow search participants to publish these search types or “tokens”, allowing the search implementation to dynamically build its set of known types from the very modules that have chosen to participate!

I really hope this article has helped to clarify how to leverage the Prism and Unity frameworks to implement something pretty cool (at least, I think it is!) Please do not hesitate to submit any questions or comments. As noted above, there are plenty of ways to improve upon this implementation but my goal was to provide enough to get someone started.

Until next time!

Posted in Code Samples, Uncategorized | Tagged , , , , | Leave a comment

Federated Search with Prism and Unity, Part II

Introduction

This is the second post in a series on implementing a web-style search inside a composite application using Prism and Unity and WPF.

In Part I, I created a new module within the quick-start solution, SearchModule, and I created a new view (and viewmodel) allowing the user to enter search criteria into a simple textbox control in my effort to emulate a web-style search. I was also able to verify that my data was correctly relayed back up to my service. Now it’s time to continue the exercise.

Part II – Search Implementation

Events and Event Data

Now that the service has been notified of the user’s search request, it needs to publish the request so that any subscribers may attempt to satisfy the search request. Prism provides a pub/sub mechanism as part of the framework, EventAggregator, which is what I will use to implement the messaging behaviors between my application components.

But first, I need to define event and event data objects that I will be using. Inside the existing Common project, I create an “Events” folder and add a new class “SearchRequestEvent.” Within the class, I define the SearchRequest and SearchResponseEvents, as well as stub classes for their respective data payloads. I chose to create these classes within the Common project over the SearchModule project because I anticipate other modules within my solution wanting to participate in search actions.

namespace Common.Events
{
    public class SearchRequestEvent : CompositePresentationEvent<SearchRequestEventData>{}
    public class SearchRequestEventData
    {
        public SearchRequest SearchRequest { get; set; }
    }
    public class SearchResponseEvent : CompositePresentationEvent<SearchResponseEventData>{}
    public class SearchResponseEventData
    {
        public SearchResult SearchResult { get; set; }
    }
}
To save space, I've created multiple classes within a single 
physical file. This is not typically a best practice.

I now need to think about what these data objects actually need to contain. For now, my search request payload will only contain the string input for the search. As for the search response, search providers need to relay enough information back to the service to indicate both a description of the result as well as some navigation information so that I could direct the user somewhere should they select that result. Also, I would like for any search participant to be able to provide more than one result, if necessary.

I created another folder inside the Common project, “Search”, and created a new “SearchRequest” class to contain my search-related classes. Using the criteria defined above I came up with the following object hierarchy:

namespace Common.Search
{
    public class SearchRequest
    {
        public string RawRequest { get; set; }
    }
    public class SearchResultItem
    {
        public string ItemText { get; set; }
        public Uri ItemUri { get; set; }
        public string TargetRegion { get; set; }
    }
    public class SearchResult
    {
        public string ResultHeader { get; set; }
        public List<SearchResultItem> Results { get; set; }
    }
    public class SearchResults : ObservableCollection<SearchResult>{}
}

Event Publication and Subscription

My end goal is to integrate my search feature with another module within the quick-start solution. But prior to that, I am going to implement a generic search handler within my SearchModule. The purpose of this handler will be to demonstrate the basics of the event publication and subscription, as well as provide a simple web search response for any given request.

There are four key changes I need to make to the DataService in order to fully participate in search:

  1. Inject EventAggregator instance into DataService constructor
  2. Update MakeSearchRequest to publish search using EventAggregator and event, event data classes defined previously
  3. Update DataService to subscribe to the SearchRequestEvent
  4. Create stub method, HandleSearchRequest, within the DataService
        private readonly IEventAggregator _eventAggregator;
        private readonly IRegionManager _regionManager;
        public DataService(IEventAggregator eventAggregator, IRegionManager regionManager)
        {
            _eventAggregator = eventAggregator;
            _regionManager = regionManager;
            // subscribe to the SearchRequestEvent
            _eventAggregator.GetEvent<SearchRequestEvent>().Subscribe(HandleSearchRequest);
        }
        private void HandleSearchRequest(SearchRequestEventData data)
        {
            if (!string.IsNullOrEmpty(data.SearchRequest.RawRequest))
            {
                // TODO: Do some searching!
            }
        }
        public void MakeSearchRequest(string parameter)
        {
            var req = new SearchRequest() { RawRequest = parameter };
            _eventAggregator.GetEvent<SearchRequestEvent>().Publish(new SearchRequestEventData() { SearchRequest = req });
        }

Points (iii) and (iv) might seem kind of funny; after all, couldn’t I call a local method directly from the MakeSearchRequest method instead of going through EventAggregator? The answer is yes, certainly, however my goal is to illustrate the publication and subscription mechanics so that I can easily replicate them later inside a module which won’t have the luxury of a local method call.

Just to check my work, I’m going to set a breakpoint inside the HandleSearchRequset method and verify the event publication and subscription are working by submitting another search.

Handle Search Request Breakpoint

Next, I need to implement the HandleSearchRequest method so that it generates the response data and subsequently publishes it back out for the DataService (still local, for now) to consume. Since the SearchResponseEvent is another event I want to handle within the DataService, I also updated the constructor to subscribe to the event and created an additional method stub for handling any search responses, “HandleSearchResponse.”

            // constructor -- subscribe to the SearchResponseEvent
            _eventAggregator.GetEvent<SearchResponseEvent>().Subscribe(HandleSearchResponse);
        }
        private void HandleSearchResponse(SearchResponseEventData data)
        {
            throw new NotImplementedException();
        }
        private void HandleSearchRequest(SearchRequestEventData data)
        {
            if (!string.IsNullOrEmpty(data.SearchRequest.RawRequest))
            {
                var query = HttpUtility.UrlEncode(data.SearchRequest.RawRequest);
 
                var gParameters = new UriQuery();
                gParameters.Add("uri", string.Format("https://www.google.com/#hl=en&q={0}", query));
                var gURI = new Uri("GenericWebView" + gParameters.ToString(), UriKind.Relative);
 
                var result = new SearchResult();
                result.ResultHeader = "Web Results";
                result.Results = new List<SearchResultItem>()
                                     {
                                         new SearchResultItem()
                                             {
                                                 ItemText = "Google Search Results",
                                                 ItemUri = gURI,
                                                 TargetRegion = RegionNames.MainRegion
                                             }
                                     };
                _eventAggregator.GetEvent<SearchResponseEvent>().Publish(new SearchResponseEventData(){SearchResult = result}); 
            }
        }

Inside HandleSearchRequest, I am taking the raw request string value out of the search request and I am creating the object graph for the SearchResponseEventData. In particular, I am creating a uri that the Prism framework will understand, consisting of a view name: “GenericWebView” and a parameter appended to that view name which is simply a pre-formatted Google search query string formatted with the raw request string value. (I will get around to actually creating the GenericWebView later in this exercise.)

Now to implement the search response handler. The DataService class already has the concept of a data model, but I am going to repurpose it to be of type SearchResults, the observable collection I defined earlier. This way I can update the data model as the search response events come in, and subsequently bind the data model to a results view I plan to create soon. Updating the DataItems class also requires that I update the interface for the DataService GetModel method.

The HandleSearchResponse method will thus need to maintain the local data model as well as notify the results view of any changes to the collection. I am going to create a project-local “SearchResultsUpdatedEvent” to use in notifying the results view.

namespace SearchModule.Events
{
    public class SearchResultsUpdatedEvent : CompositePresentationEvent<string>
    {
    }
}

private SearchResults model;

private void HandleSearchResponse(SearchResponseEventData data)
{
    if (model == null)
        model = new SearchResults();

    model.Add(data.SearchResult);
 
    // if this is the first result, we should activate the view
    if (model.Count == 1)
        this._regionManager.RequestNavigate(RegionNames.MainRegion,
            new Uri("SearchResultsView", UriKind.Relative));
 
    // notify results view
    _eventAggregator.GetEvent<SearchResultsUpdatedEvent>().Publish(null);
}

Part II, cont – The Search Results UI

In the previous section, I referred to a results view to display my search results. I even went so far as to name it within the navigation code included in the search response event handler, “SearchResultsView.” Because I believe in recycling, I am going to rename View1 to “SearchResultsView” and I am going to rename ViewModel1 to “SearchResultsViewModel” and wire them up accordingly. Conveniently, the view model is already aware of my service as well as the exposed data model. I just need to update the local variables to support the SearchResults collection instead of the DataItems collection.

I also need to subscribe to the SearchResultsUpdatedEvent and provide an event handler so that my view knows when search results are available or have been modified.

        private readonly IDataService _dataService;
        private readonly IEventAggregator _eventAggregator;
        private readonly IRegionManager _regionManager;
        private SearchResults _model;
 
        public SearchResultsViewModel(IDataService dataService, 
            IEventAggregator eventAggregator, IRegionManager regionManager)
        {
            _dataService = dataService;
            _eventAggregator = eventAggregator;
            _regionManager = regionManager;
 
            // Get the data model from the data service.
            _model = _dataService.GetModel();
            DataItemsCV = new ListCollectionView(_model);
 
            _eventAggregator.GetEvent<SearchResultsUpdatedEvent>().Subscribe(SearchResultsUpdated, true);
         }
        private void SearchResultsUpdated(string args)
        {
            // refresh the collection and raise property changed event
            _model = _dataService.GetModel();
            DataItemsCV = new ListCollectionView(_model);
            RaisePropertyChanged("DataItemsCV");
        }

While I’m thinking about the SearchResultsView, I am going to update the ModuleInit:Initialize method within SearchModule to register this view with the container and the region manager.

            // adding the search results view
            _regionManager.RegisterViewWithRegion("MainRegion",
                () => _container.Resolve<SearchResultsView>());
            _container.RegisterType<Object, SearchResultsView>("SearchResultsView");
It would be better to dynamically register and load the results 
view, thereby preventing the inelegance of an empty view being 
loaded at run-time. This exercise is left to the reader.

I’ve created the communication channels between the SearchResultsView and the DataService, but I still need to update the view’s UI so that it can display the results themselves. I would also like the UI to be able to communicate a user selection back to the view model (similar to the exercise conducted with SearchInputView and SearchInputViewModel.)

The pre-existing xaml has a data bound ListBox with the following binding template:

                <DataTemplate>
                    <StackPanel>
                        <TextBlock Text="{Binding Path=Name}"/>
                        <TextBlock Text="{Binding Path=Description}"/>
                        <TextBlock Text="{Binding Path=Id}" FontSize="6"/>
                    </StackPanel>
                </DataTemplate>

This is not far from what I want, but I have a few modifications to make, as follows:

                <DataTemplate>
                    <StackPanel>
                      <TextBlock Text="{Binding Path=ResultHeader}"/>
                      <ItemsControl x:Name="SubItems" ItemsSource="{Binding Path=Results}">
                          <ItemsControl.ItemTemplate>
                              <DataTemplate>
                                  <StackPanel>
                                      <StackPanel Orientation="Horizontal">
                                          <Button Style="{StaticResource LinkButton}" Content="{Binding Path=ItemText}" prism:Click.Command="{Binding DataContext.ItemClickCommand, ElementName=DataItemListBox}"                					    prism:Click.CommandParameter="{Binding ItemURI}" />                             
                                      </StackPanel>
                                  </StackPanel>
                              </DataTemplate>
                          </ItemsControl.ItemTemplate>
                      </ItemsControl>
                    </StackPanel>
                </DataTemplate>

Since each search result has a header and one-to-many individual results, I nested an additional layer of data binding into my template. I also defined a command to fire when the user clicks one of my results, as well as a parameter for the command bound to that item’s associated URI.

Next I will update the SearchInputViewModel to support the handling of the “ItemClickCommand.”

            // constructor, cont.
            ItemClickCommand = new DelegateCommand<Uri>(OnItemClick);
        }
 
        public DelegateCommand<Uri> ItemClickCommand { get; private set; }
 
        private void OnItemClick(Uri itemURI)
        {
            this._regionManager.RequestNavigate(RegionNames.MainRegion, itemURI);
        }

By running the solution, I can verify that my SearchResultsView is successfully display after entering a search request. However, there are a few additional cosmetic modifications that I would like to make:

  • I don’t want the “View 1” title, or the Cmd button (carry-overs from the original View1.xaml)
  • I want to show a hyperlink style result instead of a simple button.
  • I would like my link descriptions to be more…descriptive.
  • I would like to show more than one result to illustrate the binding hierarchy.

None of these should be too challenging for the reader to implement and the code for each of them will be documented in the solution files which I will provide at the end of this blog series.

After the above changes, here is the latest UI:

QuickStart Search Results

Improved search results presentation.

Much better! From here, it should not be much of a stretch to imagine how I could augment the data payload on my SearchResultItem to provide additional information in each result, such as a short summary or caption.

(And yes, clicking a link results in an error…for now.)

[To be continued in Part III – Search Results Navigation…]

Posted in Code Samples, Uncategorized | Tagged , , , , | 1 Comment

Federated Search with Prism and Unity, Part I

Introduction

While working on a composite application I started to think about typical search patterns. In a business application setting, for example performing an order lookup, the user might be presented with a UI containing a combination of textboxes and dropdowns all tied to order fields (e.g. “Order Date”, “Ship Date”, “Customer Name” and so on.)

This type of search is valuable in that it provides a way for the user to specify any combination of criteria to zero in on the specific order or orders they are looking for. But in a composite application, where the user could be working with any number of business entities across any number of application components, the challenge is to give the user a single, uncluttered way to search across all components.

Enter web search! This is exactly what the major search engines do, and in fact, I see integrated search engines in plenty of web sites these days, allowing me to either search the web or search within the context of the web site I am browsing.

Thus, my goal is to implement a web-style search within the Prism and Unity frameworks, using WPF. I will present the user with a single textbox within my main application UI, and allow the user to conduct a search that will integrate with any of my constituent application components that choose to participate in search.

I set about defining the pieces to my solution in a logical fashion:

  • Application Module containing core search functionality
    • Search Input View
    • Search Service for processing input, relaying it, and aggregating responses
    • Search Results View
    • Generic Web Search View for basic testing
  • Framework updates consumable by other Application Modules
    • Search Data Transport object or objects
    • Search-related Events

Once each of these was in place, I would be prepared to integrate existing modules with my new search functionality.


Part I – The Search UI

Rather than start entirely from scratch, I chose to start with one of the default project types that comes with the Prism installation, “Prism WPF 4.0 QuickStart Solution (Unity)”

This solution comes with the following pre-existing projects:

  • Shell – standard shell project for Prism
  • Common – shared classes
  • Module1 – Master, Edit and Detail Views (of a lightweight “product catalog”)
  • Module2 – Catalog View
If you haven't worked with the Prism framework before, it's not a 
bad idea to go ahead and run this solution and tinker with it 
a bit, just to familiarize yourself with the interactions between 
the default modules.  Once you're comfortable with the solution, 
move on to creating a new module.

Creating the Search Module

  • Right-click the solution and select “Add-> New Project”
  • Navigate the dialog to “Visual C#:Prism:Unity” and select “Prism WPF 4.0 Module (Unity)”
  • Name the project “SearchModule” and verify that it is created in the same location as the rest of your solution projects.

A helpful Readme.txt is opened by default, which instructs me to update the Shell projects ModuleCatalog.xaml to ensure the new module gets loaded by the Bootstrapper process. To do this, I double-click the ModuleCatalog.xaml file, and replicate one of the existing <prism:ModuleInfo… sections, replacing the content with information about the new SearchModule:

<prism:ModuleInfo Ref="SearchModule.dll"
                      ModuleName="SearchModule"
                      ModuleType="SearchModule.ModuleInit, SearchModule, Version=1.0.0.0"
                      InitializationMode="WhenAvailable"/>

I’m going to re-run the solution now just to make sure I haven’t broken anything.

QuickStart with Erroneous View

Where did this come from?

I notice that the UI has (unexpectedly) changed from its original state. I’m not seeing the friendly icons and product listings that were there by default with the original solution. A little digging around reveals why: When I created the new SearchModule project, it generated a default view, “View1.” Furthermore, within the ModuleInit class for this module is the Initialize method which in turn is registering and loading this default view directly into the top left region of my application frame.

After commenting out the code in the Initialize method, I verify that the UI is restored to its original state.

QuickStart with Fixed View

Much better!

Creating the Search Input View
My Search Input view will contain a single textbox with an adjacent “Go” button to submit the search.

For a fancier search textbox implementation, please visit here.  
David Owens does a great job of walking you through custom control 
creation using WPF.

To create a new view I right-click the Views directory within the SearchModule project and select Add-> UserControl. I select “User Control (WPF)” and name my new view: “SearchInputView.xaml” before clicking “Add.” Next, I open the xaml file for the newly created view and add the following code inside the Grid tags to create a Textbox and adjacent Button for the view.

        <Grid.ColumnDefinitions>
            <ColumnDefinition Width="*"/>
            <ColumnDefinition Width="Auto"/>
        </Grid.ColumnDefinitions>
        <Grid.RowDefinitions>
            <RowDefinition Height="20"/>
        </Grid.RowDefinitions>
        <TextBox Grid.Row="0" Grid.Column="0"></TextBox>
        <Button Grid.Row="0" Grid.Column="1">
            <TextBlock>Go</TextBlock>
        </Button>

To follow the Model-View-ViewModel pattern, I now need to create a view model class for my view. I right-click the existing ViewModels folder and select “Add-> Class”

In the popup dialog, I select “Class” and change the name to “SearchInputViewModel.cs” before clicking Add. The pre-existing ViewModel1.cs can serve as a template for implementing my new view model, however it possesses additional functionality that I don’t need at this time. My modified SearchInputViewModel class looks like this:

    public class SearchInputViewModel : NotificationObject
    {
        private readonly IDataService _dataService;
 
        public SearchInputViewModel(IDataService dataService)
        {
            _dataService = dataService;
            SearchCommand = new DelegateCommand<string>(Search);
        }
 
        #region SearchCommand
        public DelegateCommand<string> SearchCommand { get; private set; }
 
        private void Search(string parameter)
        {
            if (!string.IsNullOrEmpty(parameter))
                _dataService.MakeSearchRequest(parameter);
        }
        #endregion
    }

The specifics of how dependency injection are beyond the scope of this article. However, it is worth pointing out that I am injecting a pre-existing DataService class instance into my contructor. The DataService class was created by default when I created the solution. I will continue to use it after I’ve made a few modifications to support my search goals.

I’ve also defined a delegate command, SearchCommand, whose purpose is to relay user input from the SearchInputView itself and allow me to, in turn, pass it on to the DataService. I’ll accomplish this by implementing a handler for the SearchCommand, which I’ve named “Search” above. The handler method in turn calls a method on the DataService, “MakeSearchRequest,” that I have yet to implement.

Since my reference is to the interface for the DataService, IDataService, I need to update both the interface and the concrete class itself. (I am going to leave the method unimplemented for now.)

IDataService

void MakeSearchRequest(string parameter);

DataService

        public void MakeSearchRequest(string parameter)
        {
            throw new NotImplementedException();
        }

Next I want to ensure the view, SearchInputView, can communicate with the view model. This means injecting the view model as the data context for the view, as well as wiring up the “Go” button to fire my SearchCommand. The first step is to modify the code-behind for the view.

using SearchModule.ViewModels;
namespace SearchModule.Views
{
    public partial class SearchInputView : UserControl
    {
        public SearchInputView(SearchInputViewModel viewModel)
        {
            InitializeComponent();
 
            // Set the ViewModel as this View's data context.
            this.DataContext = viewModel;
        }
    }
}

Now I need to modify the view’s xaml to tie the “Go” button to the SearchCommand. The Prism framework includes some helpful syntax for converting a control event into a command. I’ve included the full xaml file below for reference:

<UserControl x:Class="SearchModule.Views.SearchInputView"
             xmlns="http://schemas.microsoft.com/winfx/2006/xaml/presentation"
             xmlns:x="http://schemas.microsoft.com/winfx/2006/xaml"
             xmlns:mc="http://schemas.openxmlformats.org/markup-compatibility/2006" 
             xmlns:d="http://schemas.microsoft.com/expression/blend/2008"
             xmlns:prism="clr-namespace:Microsoft.Practices.Prism.Commands;assembly=Microsoft.Practices.Prism"
             mc:Ignorable="d" 
             d:DesignHeight="20" d:DesignWidth="300">
    <Grid>
        <Grid.ColumnDefinitions>
            <ColumnDefinition Width="*"/>
            <ColumnDefinition Width="Auto"/>
        </Grid.ColumnDefinitions>
        <Grid.RowDefinitions>
            <RowDefinition Height="20"/>
        </Grid.RowDefinitions>
 
        <TextBox Grid.Row="0" Grid.Column="0" x:Name="SearchInput"></TextBox>
        <Button Grid.Row="0" Grid.Column="1" x:Name="SearchButton"
               prism:Click.Command="{Binding Path=DataContext.SearchCommand, ElementName=SearchInput}"
               prism:Click.CommandParameter="{Binding Path=Text, ElementName=SearchInput}">
            <TextBlock>Go</TextBlock>
        </Button>
    </Grid>
</UserControl>

Putting It Together
When I run the solution, it doesn’t take long for me to realize that I have no visual representation of any of the work I just did. That is because the framework is not “aware of” the newly created SearchInputView. In fact, I’m not even sure where I want the textbox itself to appear on the UI. I don’t really want to place the search textbox into any of the existing regions, so I decide to create a new region, TopMainRegion, that will appear directly above the main content pane.

The next steps take some familiarity with the WPF approach 
to control layout, but are not critical to the direction of the 
article.  As an alternative, load the SearchInputView into the 
existing BottomLeftRegion, being sure to comment out the 
registration code for the CatalogView within the 
ModuleInit:Initialize method in Module2.

To create a new region, I need to modify the xaml for the ShellView inside the Shell project. ShellView acts as the wrapper for the constituent application views, and therefore has the core layout defined within its xaml. To create space for the search textbox, I am going to create an additional row, insert the code for the new region, and then modify the existing controls RowSpan attributes to ensure the new region appears directly above the MainContentRegion.

New Row

        <Grid.RowDefinitions>
            <RowDefinition Height="100"/>
            <RowDefinition Height="22"/>
            <RowDefinition Height="*"/>
            <RowDefinition Height="Auto"/>
            <RowDefinition Height="*"/>
        </Grid.RowDefinitions>

New Region

       <!-- Top Main Region : My new region to hold the search view -->
       <ContentControl Grid.Row="1" Grid.Column="2" prism:RegionManager.RegionName="TopMainRegion" VerticalContentAlignment="Stretch" HorizontalContentAlignment="Stretch"/>
       <!-- This is the existing Main Region, now offset by the height of my new region -->
       <local:RegionBorderControl Grid.Row="2" Grid.Column="2" Grid.RowSpan="3" Margin="2,2,8,2" RegionName="MainRegion" Style="{DynamicResource RegionBorderControlStyle}">

With the new region created, I still need to update the Initialize method within the ModuleInit class back inside the SearchModule.

        public void Initialize()
        {
            _container.RegisterType(new ContainerControlledLifetimeManager());
            _regionManager.RegisterViewWithRegion("TopMainRegion", () =&gt; _container.Resolve());
            _container.RegisterType("SearchInputView");
        }

With the above changes in place, I am now able to verify that my view appears as specified within the UI.

QuickStart with SearchInputView

Looking good...

After entering some search criteria and selecting “Go” I can verify that I hit the breakpoint I set on the MakeSearchRequest method.
MakeSearchRequest Breakpoint

I can see that so far all of my plumbing is working as desired. The control sitting on the SearchInputView is communicating the SearchCommand (and search criteria) back to the SearchInputViewModel, which in turn is making a call to the DataService with the search criteria as a parameter.

Unfortunately, it’s time to take a break. Thank you for reading this far, and please come back soon for the next article in the series (I hope to have it out in another week!)

[To be continued in Part II – Search Implementation]

Posted in Code Samples, Uncategorized | Tagged , , , , | Leave a comment

Custom WebBrowser Control in Action!

In my previous post, I addressed creating a custom implementation of the WebBrowser control that could trap and handle popup events as well as handle the native security challenge prompt. You can read more here.

In this post, I will demonstrate the code I used around this custom control in order to leverage both pieces of functionality referred to above.


Approach

I am going to create a generic WPF UserControl that I can re-purpose depending on the secure site that I need to give my users access to. One of the first things I need to do is add a namespace reference for my custom control (as it resides in another project) to the UserControl attributes collection at the top of the .xaml file:

<UserControl x:Class="myModule.Views.SecureWebView"
    xmlns="http://schemas.microsoft.com/winfx/2006/xaml/presentation" 
    xmlns:x="http://schemas.microsoft.com/winfx/2006/xaml"
    xmlns:prism="http://www.codeplex.com/prism"
    xmlns:CommandHelper="clr-namespace:myProjectNamespace.CommandHelper;assembly=myProjectNamespace"
             xmlns:ucs="clr-namespace:myProjectNamespace.UserControls;assembly=myProjectNamespace.UserControls"

Next, I will add the control itself to my .xaml file as follows:

        <ucs:CustomWPFBrowser Grid.Row="0" x:Name="custBrowser" ucs:WebBrowserUtility.BindableSource="{Binding URL}">
            <CommandHelper:CommandSource.Trigger>
                <CommandHelper:CommandTriggerGroup>
                    <CommandHelper:EventCommandTrigger 
                        RoutedEvent="ucs:CustomWPFBrowser.PopupUriChanged"
                        Command="{Binding Path=PopupUriChangedCommand}" 
                        CustomParameter="{Binding ElementName=custBrowser, 
                        Path=PopupUri}" />
                </CommandHelper:CommandTriggerGroup>
            </CommandHelper:CommandSource.Trigger>
        </ucs:CustomWPFBrowser>

There are a number of things going on in this control declaration:

  • CustomWPFBrowser control declaration – okay, this one makes sense, we want to place our custom control on the page
  • WebBrowserUtility.BindableSource – this is how we bind the url we want our control to display, more on this in a moment
  • CommandHelper and RoutedEvent: “PopupUriChanged” – if you are comfortable with WPF this should look somewhat familiar…

WebBrowserUtility.BindableSource
I chose to implement this as a static utility class, although I suppose I could have rolled it into the CustomWPFBrowser class definition as well. This is really just a standard WPF dependency property for assigning the url to the underlying web browser within our custom control.

    public static class WebBrowserUtility
    {
        public static readonly DependencyProperty BindableSourceProperty =
            DependencyProperty.RegisterAttached("BindableSource", typeof(string), typeof(WebBrowserUtility), new UIPropertyMetadata(null, BindableSourcePropertyChanged));

        public static string GetBindableSource(DependencyObject obj)
        {
            return (string)obj.GetValue(BindableSourceProperty);
        }

        public static void SetBindableSource(DependencyObject obj, string value)
        {
            obj.SetValue(BindableSourceProperty, value);
        }

        public static void BindableSourcePropertyChanged(DependencyObject o, DependencyPropertyChangedEventArgs e)
        {
            CustomWPFBrowser browser = o as CustomWPFBrowser;
            if (browser != null)
            {
                string uri = e.NewValue as string;
                browser.Source = !string.IsNullOrEmpty(uri) ? new Uri(uri) : null;
            }
        }
    }

CommandHelper
Okay, when implementing Model-View-Controller (or in my case, Model-View-ViewModel), it is a best practice *not* to handle control events directly in your code-behind. Instead, you should map these events back to your controller (or viewmodel) for handling. (This abstraction allows for greater testability of your application.)

Great, so out of the box, I get this Commanding behavior for a button or a hyperlink, but how can I leverage it for my custom control?

In this case, I relied on a very helpful article by Tomer Shamam which I found here.

Using this sample as a reference, I added Tomer’s classes to one of my framework projects for the sake of re-usability. You’ll note that I also defined “CommandHelper” back up in the UserControl attributes section as well.

Here is the list of classes I added:

  • CommandParameter
  • CommandSource
  • CommandTrigger
  • CommandTriggerGroup
  • EventCommandTrigger
  • ICommandTrigger
  • PropertyCommandTrigger

Fortunately for me, I did not have to make any customizations to these classes as they worked “out of the box” (thanks, Tomer!)

Let’s return to the code within the .xaml file that leverages the the functionality provided by these classes.

        <ucs:CustomWPFBrowser Grid.Row="0" x:Name="custBrowser" ucs:WebBrowserUtility.BindableSource="{Binding URL}">
            <CommandHelper:CommandSource.Trigger>
                <CommandHelper:CommandTriggerGroup>
                    <CommandHelper:EventCommandTrigger 
                        RoutedEvent="ucs:CustomWPFBrowser.PopupUriChanged"
                        Command="{Binding Path=PopupUriChangedCommand}" 
                        CustomParameter="{Binding ElementName=custBrowser, 
                        Path=PopupUri}" />
                </CommandHelper:CommandTriggerGroup>
            </CommandHelper:CommandSource.Trigger>
        </ucs:CustomWPFBrowser>

All right, within the control definition, I first define a trigger. Within the trigger, I define a trigger group, which would allow me to specify multiple event to command mappings for the control. In this case, I only have a single mapping defined within the group, an “EventCommandTrigger”

This custom trigger allows me to specify an event to which to tie the trigger; in this case the “PopupUriChanged” event I defined on my underlying custom control in the previous post.

I also define the command, PopupUriChangedCommand, which I want to fire when this trigger’s condition is satisfied.

Finally, I specify a custom parameter to tie to the command; in this case I’ve chosen to pass the PopupUri property for my custom control. Recall that this property is set when a popup is triggered on the underlying browser control, along with the related PopupUriChanged event firing.

All that is left is to examine the ViewModel class to see how the command is wired up in the code-behind for the custom control.

Within the ViewModel class, I define a command delegate and a method for handling the command event:

        public DelegateCommand<EventCommandParameter<object, RoutedEventArgs>> PopupUriChangedCommand { get; private set; }

        private void PopupUriChanged(EventCommandParameter<object, RoutedEventArgs> parameter)
        {
            string newPopupUri = null;
            // retrieve the popupuri from the source control for the routed event
            if (parameter.EventArgs.Source != null)
                newPopupUri = ((CustomWPFBrowser)parameter.EventArgs.Source).PopupUri;

            if (!string.IsNullOrEmpty(newPopupUri))
            {
// DO WORK
            }
        }

In addition to the above code, you’ll need a using statement referencing the location of the CommandHelper classes.

Finally, I wire up the command in my class constructor:

            PopupUriChangedCommand = new DelegateCommand<EventCommandParameter<object, RoutedEventArgs>>(PopupUriChanged);

Note that this implementation, particularly the use of “DelegateCommand”, relies upon the Prism framework. However, I believe it should still be possible to follow this example without leveraging Prism (and therefore using an alternate command type.)


Conclusion
Well there you have it! I hope this successfully illustrated not only how to apply the custom control from the previous post, but also how you can customize event mapping behavior for WPF under a Model-View-Controller pattern.

As always, please contact me with any questions or comments!

Posted in Code Samples, Uncategorized | Tagged , , , , | Leave a comment

WPF and the WebBrowser Control

If you’re here, you probably already are aware that to date, there is no “good” WPF implementation of the WebBrowser control. I discovered this trying to solve two specific problems for my project: Authentication and Browser Popup Windows. I found solutions to each of these problems, but ran into issues when I attempted to combine the two solutions.

Specifically, I don’t want the embedded browser to challenge the user for user name and password when navigating to secured web sites. Nor do I want a new browser window to “pop out” of my application if the user clicks a hyperlink that would otherwise trigger that behavior. In order to accomplish this I performed the following steps:

  • Create a WPF User Control to wrap my custom WebBrowser logic.
  • Reference the assembly containing the native control apis for the WebBrowser control.
  • Implement a set of interfaces which in turn expose the functionality I needed to accomplish my end goals.
  • Write custom handling code for the popup and authentication events.

Background
The base class I’m working with is the WebBrowser control located in the System.Windows.Controls namespace. The underlying interface which would give me access to a lot of interesting functionality, including that which will allow me to trap a new window popup, is “IWebBrowser2.”

The interface which will allow me to trap the native authentication operation is “IAuthenticate.” So my goal is to create a customized user control which implements functionality for both of these interfaces that I can in turn drop onto a wpf form.


The User Control
The first thing I do is create a user control in a separate project to wrap all of the custom functionality I need. The xaml for the control is pretty straight-forward:

<UserControl x:Class="myProjectNamespace.UserControls.CustomWPFBrowser"
             xmlns="http://schemas.microsoft.com/winfx/2006/xaml/presentation"
             xmlns:winfrm="clr-namespace:System.Windows.Forms;assembly=System.Windows.Forms"
             xmlns:x="http://schemas.microsoft.com/winfx/2006/xaml"
             xmlns:mc="http://schemas.openxmlformats.org/markup-compatibility/2006" 
             xmlns:d="http://schemas.microsoft.com/expression/blend/2008" 
             mc:Ignorable="d" 
             d:DesignHeight="300" d:DesignWidth="300">
    <WindowsFormsHost  Name="windowsFormsHost1">
        <winfrm:WebBrowser x:Name="myWebBrowser"  Navigated="myWebBrowser_Navigated" ></winfrm:WebBrowser>
    </WindowsFormsHost>
</UserControl>

I am using the WindowsFormsHost to host the WebBrowser control. This is the recommended pattern for hosting a native forms element within a wpf control (you can read more here.)


SHDocVw.dll (WebBrowser api)
In order to access the underlying functionality exposed by the interfaces I mentioned above, I need to add a reference to a particular .dll.

This link describes the WebBrowser class I am using, as well as having some of the functionality I’ll implement. An apparent Microsoft employee, “Chango V.”, posts an extremely helpful snippet down in the comments section.

For another good walkthrough on this process, see this very helpful article by Jeroen Landheer.

Walking through the snippet posted by Chango above, the first thing he indicates is to add a COM reference to System32\shdocvw.dll or ieframe.dll (depending on your ie version.) I found the file “Interop.SHDocVw.dll” and chose to copy it locally to my project and included it as a dependency. I then added the reference by browsing to the project file location.


The Interfaces
Coming back to my user control for a moment, it’s time to take a look at the code-behind.

First comes the section containing all the COM interfaces I have to implement. I put these outside of the class definition (but under the same namespace.)

    #region COM Interfaces
 
    [ComImport,
    Guid("00000112-0000-0000-C000-000000000046"),
    InterfaceType(ComInterfaceType.InterfaceIsIUnknown)]
 
    public interface IOleObject
    {
        void SetClientSite(IOleClientSite pClientSite);
        void GetClientSite(IOleClientSite ppClientSite);
        void SetHostNames(object szContainerApp, object szContainerObj);
        void Close(uint dwSaveOption);
        void SetMoniker(uint dwWhichMoniker, object pmk);
        void GetMoniker(uint dwAssign, uint dwWhichMoniker, object ppmk);
        void InitFromData(IDataObject pDataObject, bool
            fCreation, uint dwReserved);
        void GetClipboardData(uint dwReserved, IDataObject ppDataObject);
        void DoVerb(uint iVerb, uint lpmsg, object pActiveSite,
            uint lindex, uint hwndParent, uint lprcPosRect);
        void EnumVerbs(object ppEnumOleVerb);
        void Update();
        void IsUpToDate();
        void GetUserClassID(uint pClsid);
        void GetUserType(uint dwFormOfType, uint pszUserType);
        void SetExtent(uint dwDrawAspect, uint psizel);
        void GetExtent(uint dwDrawAspect, uint psizel);
        void Advise(object pAdvSink, uint pdwConnection);
        void Unadvise(uint dwConnection);
        void EnumAdvise(object ppenumAdvise);
        void GetMiscStatus(uint dwAspect, uint pdwStatus);
        void SetColorScheme(object pLogpal);
    }
 
    [ComImport,
    Guid("00000118-0000-0000-C000-000000000046"),
    InterfaceType(ComInterfaceType.InterfaceIsIUnknown)]
 
    public interface IOleClientSite
    {
        void SaveObject();
        void GetMoniker(uint dwAssign, uint dwWhichMoniker, object ppmk);
        void GetContainer(object ppContainer);
        void ShowObject();
        void OnShowWindow(bool fShow);
        void RequestNewObjectLayout();
    }
 
    [ComImport,
    GuidAttribute("6d5140c1-7436-11ce-8034-00aa006009fa"),
    InterfaceTypeAttribute(ComInterfaceType.InterfaceIsIUnknown),
    ComVisible(false)]
 
    public interface IServiceProvider
    {
        [return: MarshalAs(UnmanagedType.I4)]
        [PreserveSig]
        int QueryService(ref Guid guidService, ref Guid riid, out IntPtr
                        ppvObject);
    }
 
    [ComImport, GuidAttribute("79EAC9D0-BAF9-11CE-8C82-00AA004BA90B"),
    InterfaceTypeAttribute(ComInterfaceType.InterfaceIsIUnknown),
    ComVisible(false)]
 
    public interface IAuthenticate
    {
        [return: MarshalAs(UnmanagedType.I4)]
        [PreserveSig]
        int Authenticate(ref IntPtr phwnd,
            ref IntPtr pszUsername,
            ref IntPtr pszPassword
            );
 
   }
 
    #endregion

A lot of gobble-de-gook here that I hope to address (at least in passing) later in the article.

Now for the class definition:

public partial class CustomWPFBrowser : UserControl, IOleClientSite, IServiceProvider, IAuthenticate
    {
        public static Guid IID_IAuthenticate = new Guid("79eac9d0-baf9-11ce-8c82-00aa004ba90b");
        public const int INET_E_DEFAULT_ACTION = unchecked((int)0x800C0011);
        public const int S_OK = unchecked((int)0x00000000);
 
        string m_User = default(string);
        string m_Pwd = default(string);
        string m_Url = "http://yoursecuredsite.com";
 
        public CustomWPFBrowser()
        {
            InitializeComponent();
            this.myWebBrowser.Navigate(m_Url);
 
            m_User = @"myDomain\myUser";
            m_Pwd = "myPassword";
 
            Start();
        }

You can see that I’m implementing a number of the interfaces that I previously defined. These will provide the hooks into the functionality I want to implement. You’ll want to update the variable assignments to reflect your site and credentials.

While researching the IAuthenticate issue, I pulled code from a number of different places. Unfortunately, my notes were incomplete, but here is one of the sites I used as a reference.

Boiled down to its essence, the approach I am taking is to designate my code as the handler for the web browser events, recognize those events I care about (handling them with custom code) and passing along (or simply ignoring) those I do not care about.

private void Start()
        {
            try
            {
                ResetToOrigin();
 
                object obj = this.myWebBrowser.ActiveXInstance;
                IOleObject oc = obj as IOleObject;
                oc.SetClientSite(this as IOleClientSite);
            }
            catch (Exception ex)
            {
                Debug.WriteLine(ex.Message);
            }
        }
 
        private void ResetToOrigin()
        {
            // Navigate to about:blank first to workaround bug mentioned in 
            //KB 320153 
            string oURL = "about:blank";
 
            myWebBrowser.Navigate(oURL);
        }

There is a well-known issue when overriding authentication whereby ie will ignore the authentication override unless the browser is navigated to “about:blank” initially.

Next, I grab the IOleObject interface off of the underlying ActiveX instance of the WebBrowser control. Using this interface, I call “SetClientSite()”, which ties together the browser control and the wrapper control. (read more here.

Now for the concrete implementations of the interfaces:

        #region IOleClientSite Members
        public void SaveObject(){}
        public void GetMoniker(uint dwAssign, uint dwWhichMoniker, object ppmk){}
        public void ShowObject() { }
        public void OnShowWindow(bool fShow) { }
        public void RequestNewObjectLayout() { }
        public void GetContainer(object ppContainer)
        {
            ppContainer = this;
        }
        #endregion
 
        #region IServiceProvider Members
        public int QueryService(ref Guid guidService, ref Guid riid, out IntPtr ppvObject)
        {
            int nRet = guidService.CompareTo(IID_IAuthenticate);
            if (nRet == 0)
            {
                nRet = riid.CompareTo(IID_IAuthenticate);
                if (nRet == 0)
                {
                    ppvObject = Marshal.GetComInterfaceForObject(this, typeof(IAuthenticate));
                    return S_OK;
                }
            }
 
            ppvObject = new IntPtr();
            return INET_E_DEFAULT_ACTION;
        }
        #endregion
 
        #region IAuthenticate Members
        public int Authenticate(ref IntPtr phwnd, ref IntPtr pszUsername, ref IntPtr pszPassword)
        {
            IntPtr sUser = Marshal.StringToCoTaskMemAuto(m_User);
            IntPtr sPassword = Marshal.StringToCoTaskMemAuto(m_Pwd);
 
            pszUsername = sUser;
            pszPassword = sPassword;
 
            return S_OK;
        }
        #endregion

IOleClientSite is largely devoid of implementation. IServiceProvider overrides the key QueryService method. I try to determine if the service requested is for authentication (which I handle) or something else (which I don’t.)

Finally, I implement the Authenticate method using the variables defined earlier in the class. Naturally you would want a way to dynamically pass these values down, rather than statically defining them.


Custom Code
So far, what I have will address the authentication issue, but does not yet address the popup handling behavior I want.

#region Custom Popup Trapping
        public Uri Source { get { return myWebBrowser.Url; } set { myWebBrowser.Url = value; } }
        public string PopupUri { get; private set; }
 
        public static readonly RoutedEvent PopupUriChangedEvent =
EventManager.RegisterRoutedEvent(
"PopupUriChanged", RoutingStrategy.Bubble,
typeof(RoutedEventHandler),
typeof(CustomWPFBrowser));
 
        public event RoutedEventHandler PopupUriChanged
        {
            add { AddHandler(PopupUriChangedEvent, value); }
            remove { RemoveHandler(PopupUriChangedEvent, value); }
        }
        
        // the crux of handling popups
        static readonly Guid SID_SWebBrowserApp = new Guid("0002DF05-0000-0000-C000-000000000046");
        SHDocVw.IWebBrowser2 innerWebBrowser2 = null;
 
        [ComImport, InterfaceType(ComInterfaceType.InterfaceIsIUnknown)]
        [Guid("6d5140c1-7436-11ce-8034-00aa006009fa")]
        internal interface IServiceProvider2
        {
            [return: MarshalAs(UnmanagedType.IUnknown)]
            object QueryService(ref Guid guidService, ref Guid riid);
        }
 
        private void myWebBrowser_Navigated(object sender, System.Windows.Forms.WebBrowserNavigatedEventArgs e)
        {
            SHDocVw.DWebBrowserEvents_Event wbEvents;
            if (innerWebBrowser2 != null)
            {
                wbEvents = (SHDocVw.DWebBrowserEvents_Event)innerWebBrowser2;
                wbEvents.NewWindow -= OnWebBrowserNewWindow;
                innerWebBrowser2 = null;
            }
 
            if (myWebBrowser.ActiveXInstance != null)
            {
                IServiceProvider2 serviceProvider = (IServiceProvider2)myWebBrowser.ActiveXInstance;
                Guid serviceGuid = SID_SWebBrowserApp;
                Guid iid = typeof(SHDocVw.IWebBrowser2).GUID;
                innerWebBrowser2 = (SHDocVw.IWebBrowser2)serviceProvider.QueryService(ref serviceGuid, ref iid);
 
                wbEvents = (SHDocVw.DWebBrowserEvents_Event)innerWebBrowser2;
                wbEvents.NewWindow += OnWebBrowserNewWindow;
            }
       }
 
        void OnWebBrowserNewWindow(string URL, int Flags, string TargetFrameName, ref object PostData, string Headers, ref bool Processed)
        {
            // Set Processed to cancel opening of the new window.
            PopupUri = URL;
            Processed = true;
 
            RoutedEventArgs args = new RoutedEventArgs(PopupUriChangedEvent);
            RaiseEvent(args);
        }
        #endregion

Phew! That was a mouthful. Okay, starting at the top, we have two properties I added so that I can pass down a url for the embedded web browser, as well as expose any popup urls triggered by user actions. Pretty straight-forward.

Next is a WPF construct: defining a RoutedEvent I can bubble up from the control programmatically when the popup is triggered. This is necessary because I intend to swallow the default behavior of popping up an external browser client.

The next piece is where I define another version of the IServiceProvide interface, named IServiceProvider2. This was the most difficult part of implementation for me, as I had wanted to use the interface definition defined outside the class (earlier in the article.) However, I needed a different signature on QueryService in order for my popup functionality to work as desired. (Someone with a bit more familiarity with COM interfaces may be able to explain this…I only know that it works!)

Following is the event handler for the Navigated event for the web browser. Similar to the code at the start of the class, where I called “SetClientSite”, I grab an interface reference to my web browser and again call QueryService. The difference is that with the modified signature, I get an entity that I am able to assign an event handler to (OnWebBrowserNewWindow) for the NewWindow event. Again, I was unable to perform this assignment successfully when using the IServiceProvider interface definition that exists outside of the class definition.

The handler itself sets the class level property to the popup target uri, lets the native framework know the event was handled (thereby swallowing the popup) and finally raises my own routed event so that the parent of the control can choose how to handle the popup event.


Conclusion
And…that’s it! I will try and follow up with a short article on how I consumed this control, as well as address any peripheral issues I may have overlooked this time around. As always, please don’t hesitate to contact me with any questions or comments.

Good luck!

Posted in Code Samples, Uncategorized | Tagged , , , , , | 4 Comments

Adding MEF Style Registration Attributes to Unity

In my current project, I plan to leverage the Prism framework and ultimately decided to go with Unity over MEF for my dependency injection container.

However, the decoration of classes with the ExportAttribute (and PartCreationPolicyAttribute for Singletons vs. Shared instances) really appealed to me and was something I wanted to “borrow” from MEF.

To get started, make sure you have the exceedingly helpful Prism project templates found here.

I found it helpful to create one project of each type and compare them side by side:
Prism WPF 4.0 QuickStart Solution (Unity)
Prism WPF 4.0 QuickStart Solution (MEF)

In Unity, type registration occurs (typically) within the Initialize method of the containing module:

[Module1]

public void Initialize()
        {
            // Register the DataService concrete type with the container.
            _container.RegisterType(new ContainerControlledLifetimeManager());

            // Use View Discovery to automatically display the MasterView when the TopLeft region is displayed.
            _regionManager.RegisterViewWithRegion(RegionNames.TopLeftRegion, () => _container.Resolve());

            _container.RegisterType("EditView");
            _container.RegisterType("DetailsView");
        }

However, in MEF, the same block of code is much cleaner:

       
public void Initialize()
        {
            // Use View Discovery to automatically display the MasterView when the TopLeft region is displayed.
            _regionManager.RegisterViewWithRegion(RegionNames.TopLeftRegion, () => _serviceLocator.GetInstance());
        }

This is because with MEF, you decorate your classes for export as follows (note that the default creation policy for MEF is Shared or Singleton):

    [Export(typeof(IDataService))] // Export the DataService concrete type. By default, this will be a singleton (shared).
    public class DataService : IDataService
 
    [Export("EditView")]
    [PartCreationPolicy(CreationPolicy.NonShared)]
    public partial class EditView : UserControl
 
    [Export("DetailsView")]
    [PartCreationPolicy(CreationPolicy.NonShared)]
    public partial class DetailsView : UserControl

My goal is to modify the Unity sample to support attribution of my exported classes and eliminate the need to manually register those types with my dependency injection container.

First, I’ll attribute the target classes so that they match the MEF sample above. To do this I add a project reference and using statement for System.ComponentModel.Composition. Now I simply copy and paste the attribute code so that my class definitions match (for each of DataService, EditView and DetailsView.)

Next, I define a base module class that implements IModule (and from which my subsequent modules will inherit.)

    public class AutoRegisterModule : IModule
    {…}

Since the goal is to off-load the responsibility for type registration, I go ahead and do it here, behind the scenes. This means I will need access to the dependency injection container:

using Microsoft.Practices.Unity;
[…]
        [Dependency]
        public IUnityContainer UnityContainer { get; set; }

The method where I implement the type registration is the Initialize method that is part of the IModule interface. I need to locate the types within the module assembly that are decorated with the Export and Part Creation Policy attributes using reflection.

        public virtual void Initialize()
        {
            var assembly = this.GetType().Assembly;
            var types = assembly.GetTypes().Where(t =&gt; !typeof(IModule).IsAssignableFrom(t));

Note the lamba statement used in the Where() parameter; it is used to filter the types within the assembly that do not implement IModule. For each of these types, I need to check the corresponding attributes and then translate those attribute values into “Unity-speak.”

            string exportName;
            Type exportType;
            bool isSingleton;
            bool doExport;
            foreach (Type t in types)
            {
                exportName = null;
                exportType = null;
                doExport = false;
                isSingleton = true;
 
                foreach (object attribute in ((MemberInfo)t).GetCustomAttributes(true))
                {
                    if (attribute is ExportAttribute)
                    {
                        doExport = true;
                        exportName = ((ExportAttribute)attribute).ContractName;
                        exportType = ((ExportAttribute)attribute).ContractType ?? typeof(object);                        
                    }
                    else if (attribute is PartCreationPolicyAttribute)
                    {
                        isSingleton = (((PartCreationPolicyAttribute)attribute).CreationPolicy != CreationPolicy.NonShared);
                    }
                }

Above, I iterate over the types and then iterate over the attributes defined on each type. Only the types that are decorated with the ExportAttribute will be designated for registration later in the code. Note that I also use the PartCreationPolicy attribute to determine whether the exported type will be a singleton. The default behavior is that any exported type will be a singleton unless decorated with the CreationPolicy.NonShared value.

This is something else I am borrowing from MEF. The default behavior in Unity is that exported types are not singletons. However, my goal is to follow the MEF model which defaults exported types as singletons.

Now that I have established the metadata for the current type, I can proceed with registration:

                if (doExport)
                {
                    if (isSingleton)
                    {
                        if (!string.IsNullOrEmpty(exportName))
                            this.UnityContainer.RegisterType(exportType, t, exportName, new ContainerControlledLifetimeManager());
                        else
                            this.UnityContainer.RegisterType(exportType, t, new ContainerControlledLifetimeManager());
                    }
                    else
                    {
                        if(!string.IsNullOrEmpty(exportName))
                            this.UnityContainer.RegisterType(exportType, t, exportName);
                        else
                            this.UnityContainer.RegisterType(exportType, t);
                    }
                }
            }
        }

The last thing I need to do is update the implementation of the Module1::ModuleInit class to use my new base class. Initialize() will now call the base class implementation, taking care of the previously explicitly coded type registration operations.

    public class ModuleInit : AutoRegisterModule
    {
        public override void Initialize()
        {
            base.Initialize();
            // Register the DataService concrete type with the container.
            //_container.RegisterType(new ContainerControlledLifetimeManager());
 
            // Use View Discovery to automatically display the MasterView when the TopLeft region is displayed.
            _regionManager.RegisterViewWithRegion(RegionNames.TopLeftRegion, () =&gt; _container.Resolve());
 
            //_container.RegisterType("EditView");
            //_container.RegisterType("DetailsView");
        }

That’s it! Nothing too hard here, but I’m happy with the end result of a cleaner presentation. Note that I still support type mapping and named instances, so I haven’t lost any flexibility here.

Feel free to post any comments or feedback!

[Edit] Need to credit Jeremy Likness for some of the code ideas used here:
PRISM, MEF, and MVVM Part 2 of 3: Making PRISM MEF Friendly

Posted in Code Samples, Uncategorized | Tagged , , , , | Leave a comment